Make Sauerkraut At Home: Healthy Probiotic Superfood
Sauerkraut, which means “sour cabbage” in German, is an ingredient that is rich in probiotics and is often consumed raw or cooked in various dishes. My recipe for homemade sauerkraut follows the authentic European tradition and provides an easy recipe to make at home in jars or crocks.
Sauerkraut is traditionally made each fall in huge quantities to last families throughout the winter. It is a source of probiotics, vitamins, and just a fresh, tangy flavor to pair with heavier dishes of meats and preserved foods.
Sauerkraut is survival food and a culinary delight that can be eaten raw or in recipes like German sauerkraut soup or Segedinsky Goulash.
See The Original Post for a printable recipe card, equipment lists, and more information.
Basic Sauerkraut Ingredients + Extras

Save This Page
All you need is cabbage and salt. You can use any type of cabbage. You can use any salt except for iodized salt.
In this recipe, I’m using the example of 5 lbs of shredded cabbage. You can use less or more. In the fall, I use my gigantic German fermentation crock to turn 20 heads of cabbage into sauerkraut to last us throughout the winter!
If using teaspoons and tablespoons to measure, you’ll want 3 level tablespoons of fine salt for every 5 lbs of shredded cabbage.
If using coarse salt — double the amount as coarse salt takes up more volume. A tablespoon of coarse salt will weigh less than a tablespoon of fine salt.
But the best way to make sauerkraut without failure is to weigh the cabbage.
5 lbs of cabbage is 2268 grams, and the ideal percentage of salt is about 2.00%–2.25% weight of salt to weight of cabbage.
The calculation is 2268 x 0.020 = 45 grams of salt.
See the Original Recipe for a list of additional spices, herbs, vegetables, and more which can be added to your sauerkraut. Popular additions are caraway seeds, juniper berries, and even carrots or beets.
Prepare Your Cabbage
Choose tightly packed heads of cabbage free from too many blemishes. Cabbage does not need to be washed; simply remove the outer leaves and compost them or shred them for your chickens or ducks!
Core Your Cabbage

Slice your head of cabbage in half and remove the tough inner core. This can also be composted or fed to your animals; mine really prefer it shredded first.
Slice Your Cabbage

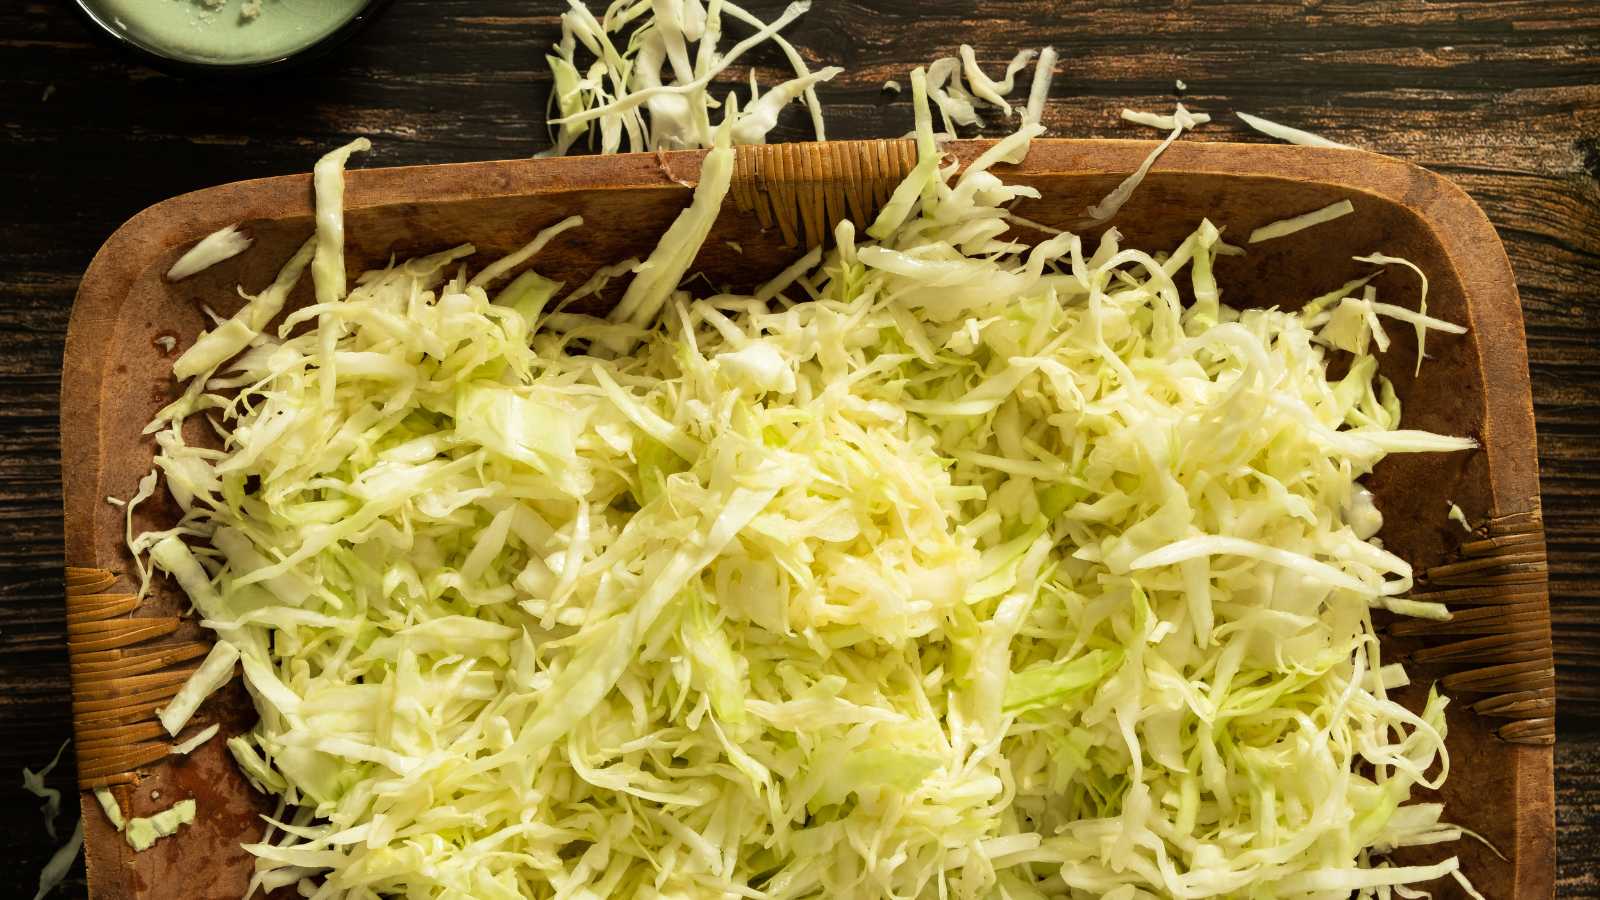
One of the key differences I see between American and European sauerkraut brands is how thinly and finely the cabbage is cut. Shred your cabbage as thinly and finely as possible. They even make special tools just for the job. We have a vintage wooden cabbage slicer and they still sell similar ones new.
Make It As Thinly Sliced As Possible

Like the picture or thinner!
Add The Salt

Remember, for every 5 lbs, it’s 3 tablespoons of fine salt. Or double that amount for coarse salt. Use your hands and rub the salt into your cabbage, massaging it.
A cabbage generally weighs between 500 and 1,000 grams (1 and 2 lb), but subtract some for the outer leaves, which you removed, as well as the inner core, which was discarded.
Let It Sit
Cover your salted cabbage and let it sit for about an hour at room temperature. The liquid from inside the cabbage will start to release, and this will make the next step easier.
Pound The Cabbage

Place your cabbage into the jar or crock, where it will ferment if you have not done so yet from the previous step. If using multiple jars, do the next step first.
Start pounding your cabbage using a wooden mallet or spoon. Pound it good and get that liquid out!
This might take anywhere from 15-20 minutes.
The brine should cover the very top of your cabbage by ½ an inch or more.
If the brine does not cover the cabbage, you must make an additional brine…
Finish The Sauerkraut

See The Original Post for a printable recipe card, equipment lists, and more information.
If you need to make extra brine to keep your sauerkraut submerged. Dissolve 1.5 teaspoons of fine salt per 1 cup of water.
I don’t bother weighing at this point.
Top up the sauerkraut so that there is at least ½ an inch of brine above the cabbage.
The final step is the second most crucial: make sure your cabbage and any other spices, herbs, vegetables, etc., you’re using stay beneath the brine and stay there the entire time the cabbage is fermenting.
You can achieve this by using fermentation weights specially designed for this purpose. If you’re going to ferment a lot of foods, it may be worth investing in some, or you can rig up a simple system.
A ziplock bag full of water can be placed on top. A clean rock (boil it for a few minutes and let it cool) can also be used.
If using the bag and water method, you may want to create a brine (as described above) in case your bag breaks and the water runs into your sauerkraut.
This way, the water won’t dilute the sauerkraut and ruin it from lack of saltiness.
Store It

Sauerkraut will ferment in anywhere from 3 weeks to 8 weeks.
Check on it and taste it after the first two weeks and decide if it needs to go longer. The flavor should be pleasantly salty and sour.
Once your sauerkraut is fermented to your desired level of sourness after 3-8 weeks, it is easy to place it in the refrigerator or your cold room or cellar, where the temperatures will halt fermentation. Enjoy your sauerkraut for many, many months raw and in recipes like the following.
Sauerkraut Recipes

Use your homemade sauerkraut in recipes like this German sauerkraut soup with meatballs.
Central European Sauerkraut Recipes

Central Europe is a treasure trove of sauerkraut recipes and one of my favorites is this incredible Slovak and Czech pork shoulder and sauerkraut stew called Segedinsky Gulas — just make it.
More Cabbage Recipes

Love cabbage in general? Check out this red cabbage soup with bacon.
Rotkohl

A traditional and popular German recipe for braised red cabbage is called rotkohl and it makes for a delicious sweet and sour side dish that pairs wonderfully with meats.

